Useful Tips and Tricks
  • Blog
  • Other
  • windows
  • Linux
  • Powershell
  • Login

Tips to speed up your PC

9/29/2013

1 Comment

 
Find and remove  duplicates
 
You may advertently end up copying the same
files  to different locations on the computer. This leads to clogging of
precious hard  drive space. Both Windows and MAC users can use the free Easy Duplicate Finder  (easyduplicatefinder.com) — a lightweight and feature-rich program that does the  job fast. 

It lets you search various drives (including external storage  such as flash drives and portable HDD) and
generates reports of each scan. For  photographers who want to find and remove duplicate photographs, a free program  called Duplicate Photo Cleaner
(duplicatephotocleaner.com) finds duplicates even  if they were resized or
edited.

Remove  Temporary  files

 Temporary files usually refer to browser files or  those that get leftover when you install new applications. Ideally, hey should  be removed automatically by the respective program, but it doesn't always  happen. 

As more and more temporary files clog up your  computer, they eat  up hard drive space and slow it down. Get the free CCleaner (piriform.com/ccleaner) which is available for both Windows and Mac. It makes short work of cleaning up your system's temporary files. Mac users can also use OnyX (titanium.free.fr) which offers advanced cleaning
options. 

Make it boot faster

 As you install more programs, you might notice  that your PC takes longer to boot up. This happens because many applications and  services automatically initialise during the boot process.
Soluto (soluto.com)  is a free Windows utility that analyses your PC's boot up
time and removes  unnecessary startup programs. 

It even lets you individually select the  programs you want to remove from startup. MAC users can do the same by going to  System Preferences > Accounts > Login Items and removing applications that  you do not want to open automatically when you log in. 

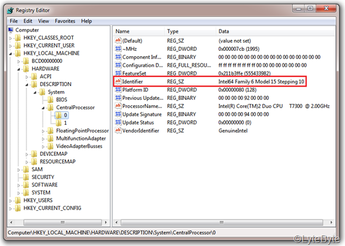
Sort out the  registry

 Unknown to many, but one of the main causes of a  slow Windows PC is a corrupted registry. The Windows registry configures and  handles every hardware and software operation on your computer and tends to get  corrupted by obsolete/invalid entries. Get the free Registry Repair from glarysoft .com/registry-repair. 

It scans your system registry for a  number of common issues and fixes them instantly. It also makes a backup of any  registry change so that if your system becomes unstable, it can be restored back  to its original state.

 
1 Comment

Useful Command Prompt Tips 

5/17/2013

0 Comments


  Tip #1: F7
If you think using Doskey to check the command history is cool, this is even
cooler. Simply press F7 and a history of the commands you have
used in the same session pops up right in
the middle.


  Tip #2: Mode to adjust the size of CMD window
Very useful when the output characters extends beyond the
80 characters.

 Syntax: mode [width], [height]

 It’s hard to have a nice screenshot to demonstrate, but type in mode
120, 25
in the Command Prompt to see what happens.


Tip #3: Color to change the default color of CMD
Syntax: color [attr]


The color attr are specified by 2 hex digits, the first one
presents to the background while the second one responses to the foreground.
Each digit can be found by simply typing color /?

 color fc

 Tip #4: Tree to show off the folder structure
Syntax: Tree [drive:][path] [/F] [/A]

 By default, it graphically displays the folder structure of a drive or
folder. The switch /F will list the files in addition to each folder.
 
If you want to output the structure to a text file, use /A switch along with
the > switch. For example, the following command outputs the structure to a
text file named structure.txt

 
c:\>tree /a d:\users\s184 > d:\temp\structure.txt


 Tip #5: RD to completely delete a folder
Syntax: RD [/S] [/Q] [drive:]path

 By default, it only removes a folder that is empty. With a switch /S, you can
completely delete a folder that still has files and subfolders. It’s extremely
useful when you want to delete folders while you are at the recovery mode with
no GUI.

 Tip #6: Run multiple commands at once
With “&&” to separate, you can run multiple commands
at once from one line. The commands run sequentially from left to right and it breaks if any of the command fails.

 Simple but useless example:

 c:\>color fc && dir


Tip #7: Tasklist to display the running processes
It not only lists all running processes on the local system but also displays
on a remote computer as well.  There are a lot of good use of it. Be sure
to use Tasklist /? to find out more. Here are a few good use of them.

The switch /SVC to list the tasks with services that host them.
 
The switch /FO is useful when outputting the results in a txt file.


0 Comments

Check if your processor is x86 (32-bit) or x64 (64-bit)

4/2/2012

0 Comments

 
Picture


Method 1: Using Regedit


Go to Start -> Type regedit

Browse to HKEY_LOCAL_MACHINE\HARDWARE\DESCRIPTION\
System\CentralProcessor\0


From ProcessorNameString you will be able to see the name of your processor and from Identifier you will see the family of the processor and if it has 64 then it is 64-bit capable.


Picture
Method 2: Using MSINFO32

Go to Start -> Type msinfo32.exe

From the System Information page under System Type you will find as x64-based PC.


Method 3: Using CPUZ

Download CPUZ

CPUZ is a small utility which gives all information about your CPU (Processor), Cache, Mainboard, Memory, SPD etc.

Under Instructions from CPU tab, if you see EM64T (if its Intel) or AMD64 (if its AMD) then your processor is 64-bit capable

0 Comments

How to Control Multiple Computers with a Single Keyboard and Mouse

6/3/2011

0 Comments

 
Picture
Use one keyboards and mice to control more than one PC's. There are couple of ways out there by using one hardware box or software.
Here there is a free software solution called Synergy. The Synergy application runs on all the computers you're using—the one that has the keyboard and mouse connected and the one(s) that do not—and lets you control all of them from that keyboard and mouse. That means you can move your mouse off one computer's screen and it will appear on the other, where you can type and work as well. And many other useful features.Check it out.
Synergy works between any number of PC, Mac, and Linux desktops.
How to:
  • Two or more computers on the same local network.
  • Synergy for Windows: If you'll be running one or more Windows PC's in your setup, download and install the Synergy Installer for Windows on each PC. (As of this writing, the current version is labeled 1.4.2 beta.)
  • SynergyKM for Mac: If you want to run one or more Macs on your setup, download and install SynergyKM on each Mac you want to use.
Linux  : quicksynergy .
Before you get started, you need to know two terms: server PC and client PC. When you set up Synergy, you'll have one "server": this is the computer that has the keyboard and mouse physically connected to it.

Download Synergy for Windows and install it on your PC. As of this writing, the most current version is Synergy 1.4.2. Install and run Synergy, then select Server (Share This Computer's Mouse and Keyboard).

Then click the Configure Server button to open a Server Configuration dialog, where you'll add all the computers that will be controlled by the server's keyboard and mouse and their position in relation to each other.

If you want to use a Mac as the server, the process is very similar using SynergyKM; launch the preference pane, select Share my keyboard and mouse, and move to the Server Configuration tab to set up your screens.

Configure Multiple Synergy Screens :

In the Screens And Links tab of the server configuration, you should already see your host computer in the graphical layout screen. (That is your server computer.)

Now, to add the other computer (your client) to Synergy, you need to know its name as well. By default, the client uses the same name as your computer on the network .
To find the name of your computer in Windows, open your Start menu, right-click Computer, and select Properties. Your computer name is listed under Computer name, domain, and workgroup settings. On a Mac, open the Sharing preference pane; your computer name is listed in the top text input.

Once you know your computer's names, drag and drop the monitor icon from the top right of the Screens and Links dialog onto the layout (we're still working on your server PC); drop the new monitor icon next to your server in the same layout as your monitors are on your desk. For example, my Mac's monitor is to the left of my Windows monitor. Double-click the Unnamed screen you just added, then enter the client's screen name.

Set up Client:

Set Up the Synergy Client Download and install Synergy on the client computer (the one without the keyboard and mouse connected).
On Windows:
If you're Synergy client is going to be a Windows computer, download the same Synergy installer for Windows. After you've installed your Synergy client, launch Synergy exactly the same way as you did on the server, except choose Client (Use Another Computer's Keyboard And Mouse). Enter the name of the server computer. To try the connection, click the Start button: first on the server and then on the client PC. Try moving the mouse off the server screen. If all goes well, it will land on the client screen safely!

On Mac OS X:
If the second computer is a Mac, download SynergyKM. After you've installed SynergyKM, launch the SynergyKM preference pane, then choose Connect to a shared keyboard and mouse. Enter the name of the server computer in the Client Configuration tab and click the Apply Now button. To try the connection, click Turn Synergy On in the General tab.: first on the server and then on the client PC. Try moving the mouse off the server screen. If all goes well, it will transport seamlessly to your client PC.

Synergy will continue running in your system tray, from which you can start or stop the application as needed. Now you're sharing the mouse and keyboard between two computers simultaneously.


0 Comments

How to: Create your own shortcuts

10/25/2009

0 Comments

 
Picture
shortcut window
You probably know most of XP’s useful shortcuts, but did you know that you can make your own to programs? To do this, right click the shortcuts icon of a program (in the desktop or preferably in the start menu) and click Properties.
Select the Shortcut tab and click the Shortcut box. Type Ctrl + Alt + V shortcuts or press V (In this example, were making a shortcut for Netbackup). You can only make Ctrl + Alt shortcuts, by the way(it comes as default even if you didnot press Ctrl + Alt). Press ok and you’re done!

0 Comments

Use portableapps without leaving any personal data behind.

10/25/2009

0 Comments

 
Picture
You can carry your favorite computer programs along with all of your bookmarks, settings, email and more with you. Use them on any Windows computer. All without leaving any personal data behind.
PortableApps.com provides a truly open platform that works with any hardware you like (USB flash drive, iPod, portable hard drive, etc). The entire platform is open source built around an open format that any hardware or software provider can use.

 Its is free. It contains no spyware.

http://portableapps.com/suite#download_details

0 Comments

Set a program to run automatically (autorun)

10/25/2009

0 Comments

 
Using autorun, you can set a program to start up automatically when you connect the drive to a computer. You can also use the same script for a data CD-ROM. Note that some computers have autorun disabled for security purposes. [Here's how to disable autorun.]

Open up notepad and paste the following script:

[autorun]

ShellExecute=filename

Label=description

UseAutoPlay=1

Make sure you replace filename with the full path to the file. For example, a file called program.exe in a folder called “programs” on the thumb drive would be /programs/program.exe

Replace description with a short description of the program, for example, My Jukebox or Mozilla Firefox.

Save the file as autorun.inf, making sure you select “All Programs” from the save menu, not “Text document”!
0 Comments

How to Lock a Folder

10/1/2009

0 Comments

 
Procedure :
1. Make a folder on the desktop and name it as “folder”
2. Now, open notepad and write ren folder folder.{21EC2020-3AEA-1069-A2DD-08002B30309D} and now (Notepad Menu) File>save as.
3. In the ’save as’ name it as lock.bat and click save ! (Save it on Desktop)
4. Now, again open notepad again and write ren folder.{21EC2020-3AEA-1069-A2DD-08002B30309D} folder and now (Notepad Menu) File>save as.
5. In the ’save as’ name it as key.bat and click save ! (Save it on Desktop)
6. Now, double click lock.bat to lock the folder and now if you open your folder, control panel will open up !
7. Now, double click key.bat to open the folder and now if you open your folder, you can access your data inside the folder again !
8. Lock your folder and hide the key.bat somewhere else on your hard disk !
9. Whenever you want to open your folder just paste the key.bat on desktop and open your folder using it !
0 Comments

Try Windows Operating System In Your Browser

10/1/2009

0 Comments

 
Picture
Have tried a Operating System inside a browser?
Windows4all.com is a Silverlight based online virtual operating system (sometimes called a Web OS or a Webtop or a cloud computer). It is is a website that simulates an operating system inside your web browser. Windows4all.com replicates the desktop environment of a modern operating system. It can give you a familiar work interface that looks the same whether you’re working at your home computer, or remotely from a borrowed or public computer. You can launch applications right away without installation.
Windows4all.com is web-based and requires Silverlight 3 to operate. Application runs in Silverlight’s security sandbox. By default code is restricted from accessing your file system or doing anything that could hurt your machine. Besides desktop, taskbar, start menu and sidebar, currently it includes such applications:

  • File Explorer
  • Internet Explorer
  • Video Player
  • Rich test editor
  • RSS reader
  • Virtual PC
  • Notepad
  • Paint
  • Chat
  • Calculator
  • Games like Chess, Solitaire, Spider etc.e
The system also supports installing program functionality.
Windows4all.com advantages:
  • Convenience and freedom - A personalized desktop is available and accessible from any computer in the world.
  • No more administration - No more software installation, software update, worry about anti-virus.
  • Security - Less prone to typical attacks, viruses, worms, vulnerabilities, spyware and disk crashes.
  • Hardware - Performance doesn't depend much on the speed of your computer.
  • Entertainment - Being online, windows4all.com offers more opportunities for communicating and entertainment.
  • Cost - It is free.
go to   http://windows4all.com

Try it !!!!!!!

0 Comments

Fed Up of the boring Old Yellow Folder Icons?[Drive Icons Included]

2/28/2009

0 Comments


NOTE: This trick hasn't been tried on Win98. 

You can easily change the boring yellow folder icons to your own personalized icons. Simply create a text file and copy the following lines into it: 

[.ShellClassInfo] 

ICONFILE=Drive:\Path\Icon_name.extension 

Save this text file by the name, desktop.ini in the folder, whose icon you want to change. Now to prevent this file from getting deleted change it's attributes to Hidden and Read Only by using the ATTRIB command. 

To change the icon of a drive, create a text file containing the following lines: 

[Autorun] 

ICON=Drive:\Path\Icon_name.extension 

Save this file in the root of the drive whose icon you want to change and name it autorun.inf For Example, if you want to change the icon of a floppy, SAVE THE icon in a:\icon_name.ico One can also create a kewl icon for the Hard Disk and create a text file [autorun.inf] and store it in "c:\".

0 Comments
<<Previous

    Archives

    September 2013
    May 2013
    April 2012
    January 2012
    November 2011
    September 2011
    June 2011
    April 2011
    November 2010
    October 2010
    December 2009
    October 2009
    May 2009
    February 2009

    Categories

    All
    All
    Backup
    Chat
    Computer
    Fun
    Hack
    Mobile
    Os
    Registry
    Sync
    Usb
    Website
    Windows
    Windows Boot

    RSS Feed

@ Anwar Ahamed Sayed